The Alfatross

The Alfatross
The Alfatross in 1965 and 50 years later in 2016

Thursday, March 27, 2014

Engine Part IV: Train Spotting (Post # 53)

VALVE trains, that is.  

In previous posts I mentioned that the Alfatross' beating heart, its engine, is being restored in Phoenix under the direction of DeWayne Samuels, aided by various vendors of parts and services.  The reassembly is taking place at Standard Machine in Phoenix under the supervision of proprietor Roger Lorton. 

When I  first looked under the hood of The Alfatross what I saw was a little weenie 4-cylinder engine disguising what I perceived at the time to be its inadequacies under an enormous air cleaner on the right side and and equally enormous shroud ducting air over the tubular exhausts.  


The enormous air filter and plenum chamber atop the Solexes covers the top of the engine on the right side.
Now that I have offended all you thousands of Alfa aficionados out there watching this blog, let me go on to apologize for my ignorance.  I now know it is not the simple, unsophisticated lump I took it for 45 years ago, and the proof of that is the following treatise on the kind of diagnosis and surgery it is taking to restore it to health and vigor.    

The following is DeWayne's diagnosis of what appears to be less than perfect with the valve train and what he is doing to correct it.  These engine guys have a wide variety of tools and treatments they can bring to bear, and I think they have used just about all of them except the one advertised below:
A tool no car guy should be without.

Cylinder Head

The valve train has a lot of individual components.  DeWayne's diagnosis divides them into cylinder head and timing chest components.  Those in the cylinder head are the valves, valve adjusters, cam followers, springs, valve guides, and camshafts.  DeWayne says:
Valve train issues include oiling problems resulting in accelerated wear damaging both camshafts and cam journals in the cylinder head, valve adjusters, cam followers, valves and guides.  Don sourced new intake valves, but the exhaust valves are excessively worn on the stems and unusable due to repeated or excessive face grinding which depleted the face margin to zero.  Exhaust valves are on order from Europe.
Original intake valves (left) and exhaust valves.  Note how the margins of the exhaust valves are too thin for reuse.
All the cam followers have been reconditioned by hard chroming the faces and creating the proper taper with Blanchard grinding to promote valve rotation. For an added measure they have been treated with a DLC (diamond like carbon) extreme pressure coating.
Replacement guides were sourced but found unacceptable as they are only offered in a standard O.D.  Because the receiving bores for the guides vary in diameter, we opted to machine custom guides from manganese bronze to offer the correct press fit for the proper dynamic tension within the bore of the cylinder head. Later the guides will be reamed and honed on the I.D. for the correct oil clearance for the valve stems.   
Alfa Romeo 1900 valves are a thing of wonder, as in "I wonder why they did that?" 

Timing Chest Components

DeWayne continues:  
Both timing chains are to be replaced as a time/maintenance service. Wear in the assembly is evidenced by the markings on each roller and the position of the chain tensioner being towards it’s outermost settings; additionally the upper chain has experienced side loading from the cams “walking” due to thrust wear issues and the tensioner bearing /shaft wear allowing side movement. Original new old stock chain sets were sourced for installation. 
Front view of the engine showing the two timing chains, upper and lower, the tensioner for the
upper chain, intermediate gear set.
The intermediate gear set requires replacement of the bushings and restoring the pivot shaft by hard chroming and bringing back to original size. An overlying issue that prompted accelerated wear was discovered in cleaning: the oiling supply orifice was not fully drilled through, resulting in an extremely limited oil supply. Opening the circuit and hand detailing before and after hard chroming has corrected the problem.
The tensioner assembly also required restoration as the chain gear was worn by the improper alignment running due to the damage of the bearing and pivot shaft. The pivot shaft has been given the same service as the intermediate shaft. We still need to source a replacement bearing and tensioner gear to complete the assembly.
Whew!  That's a lot of replacement and repair for an engine that has only 110,561.4 km (about 66,000 miles) on it.  To what extent it is the result of poor maintenance and neglect? Or could it suggest a racing history--something that has so far eluded us?

Thanks, DeWayne and Roger!


Tuesday, March 18, 2014

Casting Part II (Post # 52)


I'm back to making rubber parts again.  This time the challenge is the four bump stops (rubber travel limiters to keep The Alfatross' front suspension from travelling down too far) in the front suspension, two on each side mounted to the upper A-arms.  


Here's one of the bump stops in place in the front suspension
before removal.  Dessicated, cracked, and compressed, the
rubber parts were in need of replacement.

After removing the bump stops it was easy to see that they weren't up to the task of keeping the car from topping out anymore.  Maybe there is a secret stash of bump stops for 1955 Alfa Romeo 1900s somewhere, but I doubt it.  I didn't even bother to ask around.  Besides, I liked the idea of refurbishing the originals and continuing to use them.  

The steel and aluminum parts cleaned up easily, and the rubber tips had already peeled off two of them.  Evidently, supporting the chassis on jack stands for years may have been good for the tires, but it let the suspension compress the bump stops until they lost their original shape. 


All of the rubber tips are in such bad condition that it is impossible to tell
what the original profile was like, so I'm just guessing.  The old rubber peeled
off the steel shaft easily.  
I knew I could replace the rubber tips of the bump stops using a two-part RTV rubber compound called Flexane, but there were a couple of obstacles.  I didn't have an un-deformed original from which to get the proper shape, and I didn't know exactly how hard to make the rubber. I decided to just reproduce the existing shape without trying to make it longer or more pointed.  Flexane can be combined with a third additive called "Flex-add" to make the product more flexible and "rubbery," but the only way to achieve the right hardness is by trial and error.

The first set of experiments was devoted to getting the right proportions of the three Flexane components using one-ounce condiment cups for testing.  I allowed several days for each cup to cure before subjecting them to toughness and hardness tests--including smashing them with a heavy hammer!  I finally came up with a combination that I thought would work.  


The only way to achieve the right hardness was by trial and error.  As you can see from the numerous test cups, there was a lot of error!   
Next I tried making molds in clay in which to form the rubber tips, but couldn't get a symmetrical shape. Because I had four of these to make I thought it might be cost-effective to make an aluminum mold.  Only problem was that I don't have a lathe or machining equipment . . . but I know somebody who does!   

Harold Williams is a fellow Car Table Guy (more about the Car Table in a later post).  He is also an avid builder of radio controlled vehicles (http://www.youtube.com/watch?v=crHlnNX_HF0&feature=youtu.be), which means that he has the means, motive, and opportunity to machine all kinds of small parts out of aluminum. The mold I was looking for was just a simple cup, really, and I know he would have preferred something more challenging. But he did it anyway.


Making the mold in Harold Williams' shop.  All he asked in return was dibs on the first ride
in The Alfatross when it's finished!
Making the cast was easy.  I put a separator film inside the mold, mixed the Flexane formula, filled the mold, put the steel shaft in contact with the surface of the Flexane, and clamped it in place making sure it was vertical and stable. 

The finished mold and the first bump stop product.

Original bump stop (left) with the first example
made  with the new mold.  

Now all I have to do is make 3 more . . . and go on to the next rubber casting project.  This one was easy, given the shape of the part.  But there are some real challenges ahead.  It's a good thing Harold likes challenges . . . .


Friday, March 14, 2014

. . . And I Thought It Was Clean! (Post # 51)

The Alfatross has been at the Vintage Autocraft Spa for Collector Cars for about four months now getting massaged and pampered as never before. Vintage Autocraft's invoices list the on-going processes:
  1. construct a body cart and transfer The Alfatross from its rotisserie.
  2. remove the drip rails and clean off the filler
  3. soak the hood latch mechanisms and restore functionality
  4. install hood and deck lid to check fit
  5. remove deck lid skin from frame for repairs, bead blast and epoxy prime frame.
  6. clean corrosion from deck lid skin
  7. remove door skins, blast frames and skins.  Repair rust on frames.  weld and re-drill door panel attaching screen holes to fit 2.9 mm screws
  8. epoxy prime door frames
  9. repair door skins 
  10. Media blast and repair corrosion damage in left front wheel well by welding and grinding
  11. Fabricate and weld small rust repair at base of left rear drip base and quarter window

The Alfatross gets a butt-lift:  One of the problem areas on the body was the trunk.  At some point in the past the trunk area was dinted and the trunk area just didn't match the contours of the body anymore.  This necessitated removing the steel frame from the aluminum skin and bringing everything back into alignment--not an easy job!  
Let's face it, the last 60 years has been pretty hard on all of us--Cars and people alike.  But unlike us people, in the hands of a skilled plastic--I mean body--surgeon like Tim Marinos The Alfatross can be restored to its former beauty and youthful appearance. 

The steel frame around the perimeter of the trunk lid was tweaked.  The way
 to straighten the frame was to remove the aluminum skin.  Ouch!   
The analogy with surgery on humans is apt: As the following images show, once the knife is applied and the skin peeled back it is not a sight for the faint of heart.  It's the sight of rust, not blood, that makes me cringe! 

The Alfatross' skeleton is made of mild steel with little or no corrosion protection applied by Alfa Romeo when it was built in 1955.  So the surgeon's first task is to expose and inspect elements of the skeleton.  Because the aluminum skin is wrapped around the steel skeleton the surgeon does not have the option of physically separating the body from the chassis for a "frame off" restoration.  Another complication is the fact that many of the elements of the skeleton are hollow: round- and square-section tubes that might look fine on the outside, but be hiding dangerous levels of corrosion inside.  


Repairing the corrosion inside the left front wheel well necessitates removal
of  the outer panel to expose the area behind it.

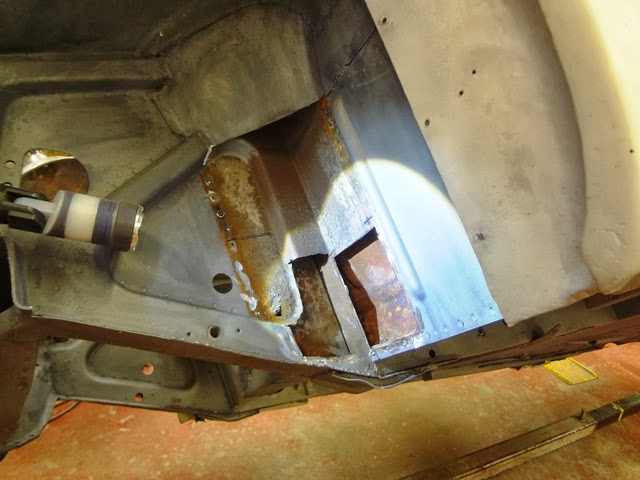
Corrosion inside the left front wheel well is a good example of how insidious this type of corrosion can be.  The exterior corrosion is obvious, but what lies behind it, inside the enclosed space?  You could just repair the exterior surface, but what if the corrosion is more extensive?  We want The Alfatross to last another 60 years, so let's do it right!  All the following images courtesy of Vintage Autocraft.


Here is the same area after "debriding" the corroded panel and affected areas
 hidden behind it--a good example of hidden damage that would have been an
even bigger problem later if only the outer panel had been treated.  


The same area following debridement and welding in replacement panels
with the appropriate contours.

The same area ground down and epoxy coated.  The outer panel still has to
be shaped, welded in, and epoxied.

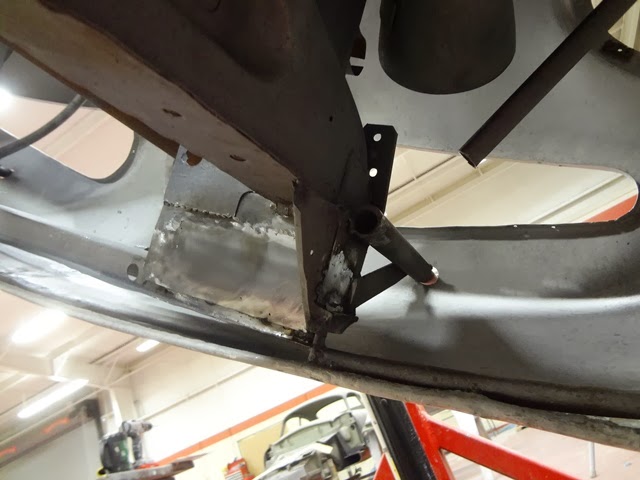
Another example: The bottom of the radiator bulkhead on the right side
 showing the corroded panel .

The same panel in the radiator bulkhead after cutting out the corroded part
and welding in the replacement.  

It looks like The Alfatross will be at the Vintage Autocraft spa for a while. Tim has identified a lot of other areas on the chassis that need rust repair.  The doors, hood and trunk all have aluminum skins wrapped around steel skeletons--and the potential for corrosion in the hidden spaces between them.  

When all of that is finished the doors, hood, trunk, windows and trim will have to be test fitted to make sure they fit before moving on to the bodywork stage.  Keep those photos and descriptions coming, Tim!