The Alfatross

The Alfatross
The Alfatross in 1965 and 50 years later in 2016

Saturday, April 28, 2018

Slip Slidin' Away (Post # 139)

Slip slidin' away,
Slip slidin' away.
You know the nearer your destination
The more you're slip slidin' away.


Left front wheel cylinder  and the offending
ball.
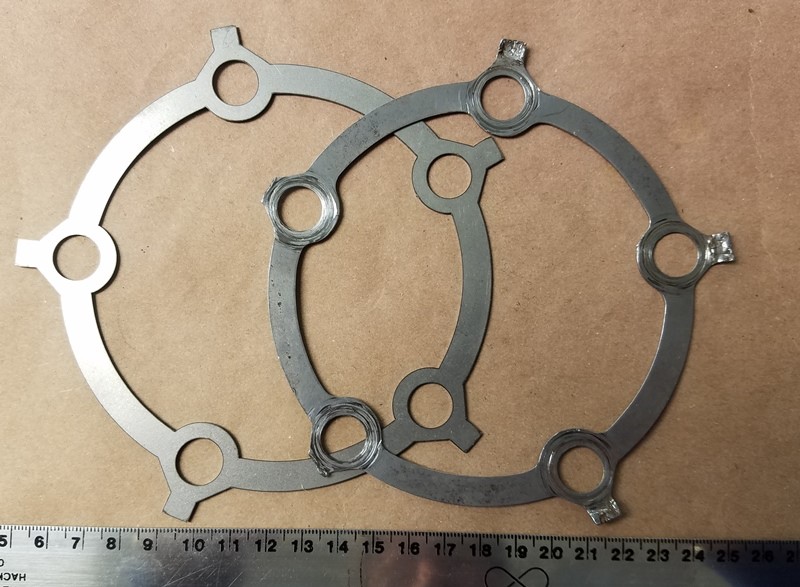
The two types of bleeder valves.  The shiny new
"improved" valve on the left and the old-fashioned ball
valve on the right.
The Alfatross' persistent brake problem continues to puzzle me even as I continue to try to trouble shoot it. I know! I know! It's a simple system with only so many things that can go wrong.  If I had a dime for every time a person helpfully suggested that perhaps all the fluid leaked out (without me noticing!), or maybe there is air in the lines, I could fly The Alfatross back to the Alfa factory in Italy and get them to do it!  

A few weeks ago  I was, under the car, working on the Alfatross' left front wheel cylinder. For some reason the bleeder wasn't acting right. When I opened it up to bleed the system (for what seemed like the tenth time!) I couldn't get a good flow, just an erratic dribble of fluid. I took the bleeder out and immediately saw that the pointed end was flattened and concave. What the . . . ?  I used a fine wire to probe the opening.  It seemed to be contacting some kind of obstruction but there was no way to look inside the bleeder opening. 

I did not really want to remove the whole wheel cylinder because that meant the wheel, hub, lug nuts, rondellas, drum, and shoes would have to come off too--a lot of work!  But I couldn't see any way around it.  


Normal bleeder on the left and the damaged bleeder
extracted from the left front wheel cylinder.  Note the
concave deformed tip caused by contact with the ball.
At that moment I realized that the SiriusXM radio was playing Paul Simon's song, Slip Slidin' Away, and I thought "Ain't that the truth"!  A year ago I thought I was coming down the home stretch with this restoration and now I feel like I'm farther away than ever!

I saw what the problem was as soon as I got the wheel cylinder off: a small steel ball was lodged in the bleeder opening.  The original 1955 vintage bleeders on The Alfatross' wheel cylinders used a steel ball to seal the opening.  The bleeder screw had a flat nose with a shallow concavity to keep the ball centered.  We switched over to the new, supposedly better-sealing bleeders with pointed ends during the restoration, but somehow this one steel ball was not removed.

So does the story have a happy ending?  No, I'm still slip slidin' away! This simple repair did nothing to ameliorate the overall brake problem (more about that in the next posts), but I am glad it was found and fixed.  And yes, I did do a thorough check of the other three bleeders, all of which were in proper order. 


Monday, April 16, 2018

There's More Than One Way to Skin a Cap (Post # 138)

The basic Motive Products pressure tank
and feeder hose.  It can do a lot of other
jobs too, like fill your transmission.

If you can't get your brake system to bleed the normal way by pumping the pedal, maybe you can pressurize the reservoir and "force bleed" it.  This is the whole premise behind a variety of kits  made by Motive Products https://www.motiveproducts.com/products/0100-european-bleeder. Sounded good to me. Nothing else I tried worked, so what have I got to lose?  I also liked the idea that theoretically you could bleed your brake system by yourself.  Theoretically.

The idea is simple, and so is the equipment: a Nalgene pressure tank with a gauge that can be pumped up to 30 psi (more pressure than you need to do the job), a few feet of clear plastic tubing, and a variety of caps to fit various types of reservoirs.They even make a kit that includes a cap for "European vehicles with a 45 mm opening".  Because the Girling tank opening measures 44.5 mm I thought maybe that's close enough.

The first problem was this breather nipple on
the underside of the cap.  A few drops of 
lacquer thinner dissolved the adhesive  and it
came loose by itself.
So I ordered one.  I did not really expect any of the supplied caps to fit The Alfatross' 1950s vintage Girling reservoir, so I was not disappointed when they didn't.  The only question was what would it take to make it work?  Could the Girling cap be modified to take the feeder hose and be leak proof?  Only one way to find out! Fortunately, I had a spare Girling reservoir I could experiment with.  It turned out to be pretty easy to adapt the Girling cap to the basic Motive Products kit. The hardest part was patiently waiting for the adhesive to set.

As I write this, the cap is on the reservoir in the car and I have pressurized it. The pressure tank's volume is 2 liters, which is way more volume than the brake system needs.  It would have been helpful if the manufacturer had mentioned that even with 5 bottles of fluid in the tank it takes about 150 strokes to get the pressure up to 15 psi! 

The "power bleeder" does work and it can be done single-handed, but through no fault of its own, it did not cure the problem(s) The Alfatross is having.  More about that in the next post(s).

Now, with the nipple out of the way I could
drill through the cap from the inside and screw
on this nylon hose barb fitting.  

A generous amount of my favorite all-purpose
adhesive, E-6000, made it an airtight seal.


At this point the cap was reunited with the
reservoir and pressure tested before being
filled with brake fluid.
The center of the original rubber cap seal had
to be removed to accommodate the end of the
hose barb.


The right-angle hose barb seemed like a good
idea at the time because there is very little

clearance between the top of the cap and the
body, but it made removing and reinstalling
 the cap very clumsy.  Of course this cap is  just
 for "power bleeding".  The original goes back 
on for normal service.


Sunday, April 8, 2018

For Questions About Originality, Ask Italy! (Post #137)

Gigi's photo of an original aluminum master cylinder cover
(copertura) in place.  Luigi Ventura.
Original copertura (right) and its
 reproduction.  Paolo Galafassi.

As mentioned in the last post, Gigi Ventura made me aware that his friend Paolo Galafassi (https://www.classicvintagecar.it/) has not only rare original examples of the heat shield over the first muffler set, but also the "copertura" covering the master cylinder.  I have to admit I was at first skeptical that such a feature was an original factory item because although I have seen the underside of quite a few 1900s, none of them was equipped with one.  Furthermore, no such cover for the master cylinder appears in the official Alfa parts catalog for 1900s.  The first photo Gigi sent did nothing to convince me.  It showed a somewhat battered-looking alloy box, open at the top and back, covering the area around the master cylinder. Then I noticed in the same image the unusual finned oil pan sump, oil filter housing, and the front suspension lowering spacers.  Hmmmm--maybe the copertura was a modification too?
The factory-installed screw holes in the Alfatross' chassis
for attaching the master cylinder copertura.
One of The Alfatross' original rondellas (right)
and Paolo's reproduction (left).
I wrote back to to Gigi to express my skepticism. In reply, he sent photos of an original surviving copertura alongside a reproduction made by Paolo's shop.  But the thing that really convinced me that coperturas were original factory equipment was the four attachment points Gigi told me to look for on The Alfatross' chassis.  Sure enough, there they were, and not just holes drilled for sheet metal fasteners, but carefully made threaded inserts for 5mm x .80 machine screws!

I immediately put in an order with Paolo for reproductions of both the exhaust heat shield and the copertura.  On the same page of Paolo's Web site  https://www.classicvintagecar.it/catalogo/ricambi/alfa-romeo/1900/freni-1900/, I also saw something else I had been looking for: rondellas--the steel rings that securely lock the lug nuts to the splined wire wheel hubs. 

Paolo's reproduction copertura fit The Alfatross perfectly.
It will be painted black to match the chassis color.
Note the 3 fasteners along the longitudinal
frame member and 1 on the transverse
member.
Having had some bad experiences during The Alfatross' restoration when ordering reproduction parts, I am delighted to report that all three orders arrived quickly, were carefully packed, and just as advertised--and the prices were very reasonable.  Grazie Gigi and Paolo! It doesn't get any better than that . . . .