The Alfatross

The Alfatross
The Alfatross in 1965 and 50 years later in 2016

Tuesday, June 16, 2015

More Than Meets the Eye (Post # 86)


A tall engine, to be sure!  Once the cams finally come back it can be completely reassembled. All the other parts and sub-assemblies are ready for installation. DeWayne Samuels.
The engine still ran when I bought the car 46 years ago, but just barely. It showed every symptom of having been rode hard and put away wet. It smoked, drank (fuel), and had difficulty waking up in the mornings. At that point it was, after all, just an old used-up sports car of a make most Americans had never heard of. But it was all there. In a way, the engine's numerous problems probably saved The Alfatross' life and maybe even my own: If you're afraid to drive it, you won't get into trouble.  
The engine in about 1980.  The air cleaner housing and
exhaust manifold shroud have been removed.  Evidently
the cam covers and cylinder head were stripped of their
finishes before I got the car when they were removed to
do a valve job.

The original matching-numbers engine looked pretty good on the outside. Sure, it was rusty, the carbs were gunked up, and the rubber parts had given up their ghosts, but until the initial disassembly and scrutiny I was still hoping that maybe all it needed was a good cleaning up and a little mechanical massaging--but no such luck. The cams were worn badly, apparently the result of inadequate lubrication. The exhaust valves were ground too thin to reuse and all the guides were sloppy. Piston number 3 had nicks on it from a foreign object that somehow found its way into the combustion chamber. The sprockets on the cam chain needed to be replaced. The distributor drive gear was cracked. The more we looked the more problems we found.

So the engine restoration mandate became to disassemble and analyze all parts for evidence of wear and injury, repair all items that could be repaired, replace items that could not be repaired (with better than original equipment whenever possible to promote reliability and longevity), and tune it to produce strong performance using modern fuels.

The Alfatross' engine is now almost complete.  Once the cams come back it can be completely reassembled, run in, tuned, and dyno tested.  Changes have been made internally, but the engine's outward appearance remains the same as when it came from Zagato.  

I will restrain myself from estimating exactly when it will be ready for me to pick it up, but it won't be long now.  Why does it take so long and cost so much to restore an old four-cylinder two-liter engine built more than 60 years ago? 

Oil pump internals. DeWayne Samuels.
Well, let's take a look at DeWayne's description of what needed to be done to a relatively simple part of the engine, the oil pump: 

Oil Pump and pickup: continue from receipt desassy for rebuild and restoration. Deburr, smooth, blend and detail oil passages and pressure cavity. Surface base and face plate. Fab gaskets as supplied units are shrunken. Assemble with friction coated gearset and install.
The engine block was a little more complicated. Following basic disassembly, cleaning and inspection:
Machining the cast iron engine block.  Roger Lorton.
Engine block: Prep as required after all machining work, including but not limited to chase and verify all threads. Oil pressure circuits optimized for flow. Glyptal paint internals for oil shedding and to seal the cast iron. Install all main cap alignment dowels and end cover and cylinder head locating dowels. Install all studs internal and external. Final prep and install of main bearings. Install crankshaft assy. Measure thrust end play--excessive clearance, no proper bearings available, send bearings out for additional babbit layer. Set thrust with rebuild bearings after many sizing fitments. Finalize mains and set torque.

The color of the deep oil sump was derived from a paint
chip from Jean-Marc Freslon's 1900. DeWayne Samuels.
Even the oil sump needed a bit of brazing and refinishing in a color computer-matched from a paint chip taken from a friend's 1900 sump.


But those procedures are child's play compared to issues posed by the cylinder head, valves, guides, and cams--which I described in a previous post. In fact, the cams are still what's holding up completion of the engine.


The cylinder head, cams, and valves needed the most attention. Where are those damn cams? DeWayne Samuels. 


Right rear view without the intake 
manifold in place. The cams are 
still MIA. DeWayne Samuels.
Intake manifold, painted and ready to be installed as soon as 
the cams come back from . . . wherever they are!  
DeWayne Samuels.

Why does it take so long? The main reason is because during the 40+ years  that The Alfatross spent sleeping like Snow White, waiting for Prince Charming to come along and bring her back to life, unforeseeable world events were conspiring to make her ever more rare and desirable. For such a car exceptional care must be taken with every aspect of its restoration. It has to run as good as it looks.


Tuesday, May 26, 2015

Tim vs. the Trim (Post # 85)


Now that The Alfatross' chassis and body are finished and in primer, Tim is concentrating on making sure all of the trim pieces fit and are finished properly. In keeping with using light weight aluminum for the body panels, Zagato also employed it for virtually all trim and filler panels, hand formed from sheet or using various configurations of bar stock made from pure aluminum. 


The Alfatross' door handle housings and minimal polished
aluminum trim can be seen in this photo from about 1979.

This includes the chrome trim rings around the headlights and turn signals, the aluminum door handle housings, windshield and rear window surrounds, hood scoop trim, license plate light housing, and a number of pieces in the interior. After the preliminary fit it all has to be removed before the body can be painted, and then re-installed after the paint has cured completely.  
The cracked hand-made passenger's side door handle
housing posed a nerve-wracking  repair challenge.

Since modern aluminum is almost always alloyed with other metals, it is very difficult to locate pure stock in any form other than sheets for replacement and repair purposes.  It is important to replace or repair using pure aluminum because the presence of any other metal (like copper) in the repair material can change its color and forming characteristics.  


Tim micro-welding the broken door handle housing. Tim
Marinos.

This may be acceptable on some painted pieces but not on polished parts, e.g. window frames, or parts requiring forming work.  When simple, flat pieces that are supposed to be highly polished such as sill plates and lower inside door cover panels are overly-corroded, it is sometimes more efficient to hand-form replacements from new material rather than trying to repair them.  


Clamped firmly in Tim's vice the door handle housing is
first tack-welded, then the cracks are "V" cut and TIG
welded with 1100 grade aluminum rod.  Tim Marinos. 
But what does one do with a cracked door handle housing, corroded and damaged window frames, etc. that require welding and that also must be polished? There are still a few suppliers on line that sell 1100 pure aluminum welding rod. Alternatively, wire rod can be cut from sheet stock.


There is a lot of manual labor involved using the same
techniques that the original Zagato craftsmen employed 60
years ago.  Tim Marinos.

By using the correct replacement material, welding rod, and proper repair techniques, it is possible to make undetectable repairs in keeping with period correct building practices.

Fortunately for the Alfatross, Tim is willing and able to "tame the trim" and expertly craft the repairs.

The finished repair before polishing.  Tim Marinos.

The corroded corner of one of the hood scoop trim pieces
required re-welding and filling with 1100 rod . . .

. . . followed by careful filing and polishing.  Both by Tim Marinos.

Thursday, May 21, 2015

Under the Influence . . . (Post # 84)


Under the Influence.
. . . of Route 66, that is!  A couple of weeks ago some friends invited me to go with them to the "Route 66 Fun Run" an annual event celebrating, well, Route 66--"The Mother Road." One of my earliest memories is of a TV show by that name featuring two young all-American men wandering the highways looking for adventure in a C1 Corvette. I was infatuated by the concept and wanted to do that too! I don't remember anything about exactly where they went or what they did.  All I remember is the hypnotic theme song and the afterglow I felt at the end of each episode that put me permanently under the influence of the Great American Road Trip . . . and since you can't make a road trip without something to ride in . . . cars! 
The American West is BIG!
So of course I accepted my friends' invitation immediately. Then I discovered that Route 66 no longer exists. It was superseded decades ago by the Interstate Highway System. The little towns that once depended on it withered and died. But vestigial bits and pieces of the old 2-lane tarmac still remain--bypassed and now just back roads--but they're still there.  One of them is a stretch between "survivor towns" Seligman and Topok, Arizona. This is where the Fun Run takes place.

Main Street (on old Route 66) in Seligman, AZ, starting line
for the Route 66 Fun Run.  Drive what you brung!

The 500 mile, 8 hour drive from Santa Fe to the starting line at Seligman paralleled a lot of the original route.  That gave us plenty of time to ruminate about things, like the way the invention and evolution of the automobile changed just about everything in American life.   
The first roads were rails and the first cars were pulled 
by "iron horses." This one is in Kingman, Arizona.  

The personal automobile is the embodiment of freedom, but it needs a road to access that freedom.  That's what Route 66 did so well, and although the route itself eventually yielded to 4-lane interstate highways dedicated to moving as much traffic as fast as possible, losing a lot of its original mystique along the way, the legend survives. 


Better take along a spare gas can . . . .

Route 66 started out in 1926 as a link between Chicago on Lake Michigan and Los Angles on the Pacific coast. It was a long, often lonely drive across thousands of miles of prairie, high desert, majestic mountain ranges, mighty rivers, Indian reservations, widely spaced gas stations and a really big sky, altogether spanning about 2,400 miles across 8 states. 

It became a by-word for travel, exotic locations, and adventure in America.  The allure spread far and wide in song, literature and theater.  Today thousands of tourists from all over the world come to the US specifically to drive portions of Route 66 in cars, RVs, motorcycles, dedicated tour buses and even bicycles.  We saw a lot of them--and they were all smiling!

We were smiling too, utterly relaxed. We had three sunny, cool days to cover 70 miles, so no one was in a hurry. I found myself wondering what The Alfatross would think about this storied road. Construction on the US Interstate Highway System--that we all now take for granted--was not started until 1956, the year after The Alfatross was born.  It struck me that Old Route 66 and The Alfatross are both experiencing the same type of nostalgic re-birth that things go through if they survive long enough.  They are contemporaries: the car and the kind of 2 lane blacktop road it was designed to travel.  I allowed myself a little daydream--that maybe one day in the not-too-distant future they will get the chance to meet in person . . . .
Some stops along the way haven't changed much. Gas station at Hackberry, AZ.

"Bilt, not bought!"  Deluxe Rat Rod.


It's not the destination . . .  it's the journey!  Roadside breakfast: We don't need no stinking restaurants!  

Get your motor runnin'
Head out on the highway
 Lookin' for adventure
In everything that comes our way!
--Steppenwolf

Saturday, May 9, 2015

The Dyno(saur)meter (Post # 83)

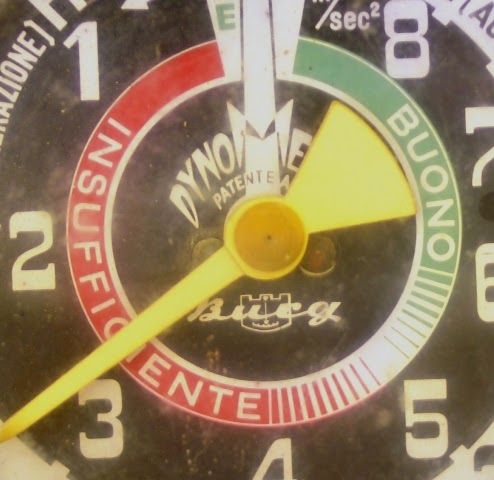
The Alfatross came with a strange looking instrument bearing the label "DynoMeter."  Former owner Pat Braden writes in his book Alfa Romeo All-Alloy Twin Cam Companion 1954-1994 that the man he sold it to (the man I bought it from) "never knew the car carried an (originally fitted) accelerometer." I think the DynoMeter is the accelerometer that Braden was talking about.  How he knew it was "originally fitted," and exactly what that phrase means is a mystery. To the best of my recollection, when I bought The Alfatross 46 years ago it was included, but no longer attached.
The Burg DynoMeter before restoration.  The 
more you look at it the less you understand!
Profile view of the DynoMeter.  There are no
connections, electrical or otherwise.
I puzzled over this thing for many years.  What does it do?  How exactly does it work? Where and how is it supposed to be mounted?  Why can't I find any information about it?  Is this the only one left in the world?  Is it another mute, but tantalizing indicator of race history?

Thanks to the indefatigable efforts of Jeff Kramer, Internet Nightcrawler, we now have answers to some of those questions--but by no means all.


Bands, Numbers, and Increments


The Burg logo appears to show a pendulum hanging from
the top of a box with a graduated arc just below it: a
simplified schematic of the mechanism inside?


The steel housing is surrounded by a chrome band with a peculiar clamp. Both detach easily from the dial face and inner body. No clues there. 

Only the dial face hints at who made it and what it does. Starting in the middle of the dial we see that it is called a "DynoMeter" and it appears to have been manufactured by a company called Burg.  The Burg name is written in script over a logo that appears to depict a pendulum suspended over a graduated arc.  This is an important clue. The device appears to be patented "PATENTE ANG.", but where? 

All the text is in Italian, but it could have been produced anywhere with dial faces appropriate for the market.  At first glance, it could be mistaken for an item from the Italian equivalent of the J.C. Whitney catalog, but on further close inspection there is more than meets the eye.

This might get a little tedious, but I just want to point out some details that are easy to miss if you aren't paying close attention.

The dial face is divided into four bands encircling the pivot point for the needle. The outermost and innermost bands are symmetrical circular bands, but the two between them taper as they spiral around the dial face. 


Acceleration is measured on the white band in meters 
per second squared when the needle moves in a clockwise 
direction.  Braking is measured similarly when the needle
moves in a counterclockwise direction.

The outer black band is evenly divided into 80 increments representing percentages of G-force, and numbered 0 to 40 % reading from top to bottom clockwise and counterclockwise respectively. Note that the outer band is labelled "discesa" (deceleration) left of the zero point at the top of the band, and "salita" (acceleration) right of the zero point. Are you following this? Good, because it's about to get complicated.


Acceleration and deceleration are measured in different ways on four information bands.

The largest text is at the top of the dial face. On the left is the word "FRENO," meaning "brake." It is in white letters on a black band.  An arrow beneath it points in a counterclockwise direction. To the right of the 0 point at the top of the dial is the word "MOTORE, meaning "engine," in black letters over a white background.  And in the middle, between them, is the word "FOLLE" in red script, meaning something like "don't even think about it." These comprise the second and third bands.

In addition to the percentage increments around the outside of the dial face band 2, the white band just inside it, is numbered clockwise 1 through 4 from top to bottom in meters per second squared.  Although the numbering stops at 4 at the bottom of the dial, there is one incremental mark beyond the 4. The black band inside the white one is labelled counterclockwise 1 through 8 meters per second squared. Note that the distance between graduations decreases dramatically. 

The fourth band is labelled and graduated somewhat vaguely compared to the others. All of the left side of the band and part of the right side are labelled "insufficient" in white letters on a white background and the remainder of the right side is labelled "good" in white letters on a green background.  

So what does all this tell us?

The Bowmonk Connection

Searching for information on dynometers, Jeff made contact with Mr. Ernie Hill at Bowmonk Ltd., the British manufacturer of Bowmonk Brakemeter/Dynometer, used primarily as brake testers (http://www.bowmonk.com/automotive/brakemeter). According to their literature their meter, which is substantially the same as the Burg, 
consists of a finely balanced pendulum free to respond to any changes in speed or angle, working through a quadrant gear train to rotate a needle round a dial. To damp out vibration, the instrument is filled with a special fluid not sensitive to changes in temperature. No maintenance is necessary.
The dial is calibrated in percentage "G", the accepted standard through the world for measuring acceleration and deceleration.   
Here's a helpful little schematic and formula to help clarify the above statement.  Say what?

So now we're getting somewhere. Bowmonk was able to clean and repair The Alfatross' DynoMeter and refill it with the anti-vibration fluid, which had leaked out long ago . . . but they are just as much in the dark about the Burg company and this particular device as we are.


The Burg DynoMeter after cleaning and restoration by
Bowmonk, Ltd.

It is clear that we are missing part of the instrument's mounting apparatus, perhaps just a simple bracket. At some point in the not-too distant future we're going to install this thing in one of our vehicles and field test it to see how it actually works.


Bowmonk provided this certificate of calibration after restoring
the Dynometer giving it a clean bill of health!


Monday, April 27, 2015

Key Thoughts (Post # 82)

Life is full of keys: the key to happiness, the key to success, the humble house key, office key, car key.  We all have scores of them.  When you need a copy you just take the original down to the local hardware store and get one made . . . .  unless the key is for the glove box of a 1955 Alfa Romeo 1900C SSZ! 


Old Keys Are Different

Where a modern car has A key that opens everything, it takes 4 keys to open the locks on The Alfatross: Key 1 unlocks the driver's side door.  Key 2 is for the ignition switch.  Key 3 lets you into the glove box and you need Key 4 to open the trunk.   Why so many keys?  I guess it's a Zagato thing.  Every lock came from a different vendor. Zagato didn't make its own ignition switches or door locks.  

The Alfatross came with one key for each of the four locks.  Remembering how many times I have locked myself out of various cars in the past I thought it might be a good idea to have spares.  Locking yourself out of a daily driver is an inconvenience.  Misplacing the keys to a 60-year old Classic could turn into a disaster!

At the local locksmith shop the attendant eyed my four keys warily, then turned to an entire wall of key blanks--hundreds or maybe even thousands of them--and started looking for matches.  It took a while, but he managed to find blanks for three out of the four, and cut them.  The fourth one was the ignition key--sorry, no match for that one! Any idea where I should look for a match?  A shrug.  

When I got back to The Shed and tried the three new keys, none of them worked.  Everything was right except that the key tongues were too thick. This is how I found out that the only sure way to know if a duplicate key will work is to take the lock with you to the locksmith shop as well as the key you want to duplicate.  


To the Web!

I deduced that the ignition key was not original from the fact that it was made by the Taylor Lock Co. of Philadelphia, USA.  Too bad, but after the passage of 60 years and 7 owners it was too much to expect the original key to still be with the car.  


The Alfatross' ignition key (not original).  Millimeter scale
at top.


Trunk key, probably original.  What does FIST stand for?
No other markings present.

But the other three key were so strange-looking that I think they probably are original.  The keys could be cut locally, but where would I find the right blanks?  The Taylor Lock Co. name was my only clue, but it turned out to be a good one. Taylor was bought out by the International Key Corporation.  A quick query over the Internet and I was in contact with Errol in Customer Service.  Yes, they have Taylor blanks with numbers matching those on my key and would send them right away.  One problem solved.


Glove Box key, probably original.  What does the "T"
signify? No other markings present.


The other three weird keys are turning out to be more of a challenge.  Two of them were short and stubby but kind of classy-looking.  Both bore the letters FIST surrounded by some fancy curlicues.  There were no other markers or numbers that I could use to narrow down the search.  The third key's only distinguishing characteristic was what looked like a capital "T" inside a box.


Door lock key, probably original.  No other markings
present.


This is where I discovered how hard it is to describe a key that doesn't have any name or number on it. Good luck asking for the trunk lock of a 1955 Alfa Romeo 1900C SSZagato"! 

First I sent out photos to various vendors.  They said "we need to see both sides." So I sent out pairs of photos. Then they said "show the keys on a metric scale with the hilt at 0." I did.  Then they said "What does the end-on profile look like?" So I sent photos of clay impressions. Then they said "Oh, just send us the damn keys and locks and let us sort them out!"


Key profile impressions made in clay.


Personal Connections

So that's where we are now. I still don't have all the duplicates The Alfatross needs, but I do have a much greater respect for the humble key!  The ignition key may not be original, but the other three are a physical connection with the previous 6 owners of The Alfatross, going all the way back to its first owner, Alessandro Costantini Brancadoro in 1955.  

And there is another connection as well, one with the Italian movie star Massimo Girotti (http://en.wikipedia.org/wiki/Massimo_Girotti), a very popular screen actor in the mid-1950s.  The chain that now holds The Alfatross' ignition key belonged to him.  It was given to me by his son, Alessio, with whom I had often discussed my plans to restore the car and--who knows--maybe take it back to Italy some day and run it in the Mille Miglia.  When he laid the chain in my hand he said solemnly, "My father would approve!"  

Maybe I'll even take The Alfatross back to Bronzetti & Ternati and ask for a tune-up!

Sunday, April 26, 2015

Looking back . . . . (Post # 81)

One of the original door mirrors.  Note the deep
denting and corroded base. 
The Alfatross had a matching set of British-made Raydyot aluminum mirrors on the driver's and passenger's side when I bought it.  The brushed aluminum housings were free of corrosion but the bases were showing rust and the housings themselves were dented in several places. Moisture had crept in around the reflective surfaces rendering them useless.  The biggest problem would be getting the dents out of the soft, cone-shaped aluminum housings.  I considered what it would take to restore the originals to an appearance in keeping with the rest of the project and elected instead to replace them with identical reproductions.  Well, almost identical.  The originals have the Raydyot logo elegantly engraved on top of the housing.  The reproductions do not, probably to avoid patent infringement issues. What to do?  


The Raydyot emblem engraved on top of  one of the original
mirror housings . . .
Having already done business with Scott Babcock, Engraving Manager at J. Chadwick Engraving (http://www.jchadwickengraving.com/contactus.php) regarding another matter, I sent him a photo of the Raydyot emblem to ask if he could reproduce it.  No Problem, but he would need to have one of the original housings to make a pattern and get the proportions right. I give Scott and J. Chadwick Engraving high marks for customer service, attention to detail, communication, and professionalism.  The skill involved is obvious!


At my request, Scott sent this photo of one of the engraving machines he uses. Looks complicated!  Scott Babcock.
. . . and the newly-engraved reproduction mirror housing. 
Scott Babcock.


While writing this post I realized that I had never paid much attention to the mirrors on other 1900C SSZs that I have photos of.  So I reviewed the images and discovered that only 14 (about half) of them have outside mirrors.  Of these, there is little commonality with respect to mirror shape or location. Almost all are on the driver's side door or front fender, but their types and shapes vary widely. The rest do not have outside mirrors at all!  The presence of mirrors on both sides of the car is a rare characteristic shared only by The Alfatross and two others. 


Mirror type and location on Chassis 01845: a flat keystone
shape mounted high on the driver's side front fender.
Octane Magazine.


I began to wonder if The Alfatross' mirrors are "original equipment" or were added some time between its manufacture in 1955 and the oldest photos of it in 1965. Many of the other 1900C SSZs I have photos of have been restored and updated for use in modern traffic, so they may not be representative of their original appearance.


Mirror type and location on Chassis 02056: a round
bullet-shaped chrome housing  mounted on the
driver's door.  Tim Marinos.

I also started to wonder if the presence of outside mirrors might be evidence of a car equipped for racing, but then noticed that chassis no. 01931 was definitely raced, but period photos show it without outside mirrors. When it was "unearthed" a few years ago it had no mirrors, but after restoration it gained mirrors on both sides! This serves to remind us that mirrors should be considered more as options than as part of a car's original fabric.

Mirror type and location on Chassis 01747: round bullet-
shaped mirrors mounted high on both doors. 


Thursday, March 12, 2015

Read 'em and Weep! (Post # 80)

While looking for something else in my Alfatross files I came across this page of cars for sale in Road & Track's Market Place dated 1969, the year I acquired The Alfatross. At first I wondered why I kept it, until I spotted the photo of one of The Alfatross' brethren offered for the princely sum of $2,500!

Most cars are liabilities, not assets . . . aren't they?  Not these! [All current values taken from the 2015 Sports Car Market Price Guide].
Blast from the past.  .Road & Track market place ads, 1969--the year I was tricked
into buying The Alfatross from my cousin Bo.    If we only knew then what we know now!
1939 AR 6C2500 (50 built).  Value today: $535,000-700,000.


Expensive!  Value today: $400,000-750,000.
Or real estate?  Has it appreciated as much?  Value today:
$375,000-650,000. 
Self addressed, stamped envelope?  How quaint!  Value 
today: $97,500-185,000.


Gas hog.  Gotta get rid of it!  Value now:$975,000-1,250,000.


So is it a Cobra or a Mustang?  Never hot-rodded?  Why did you buy it?  Value now: $850,000-1,000,000.


And last, but not least . . . .


So did you get the whole $1,500 or did you have to drop the price to get rid of it?  Value now:
$900,000-1,400,000. 
The clause in the contract between Bo (the seller) and me (the buyer) whereby I became the
Steward of The Alfatross in 1969 (and the Honda was wrecked!).  It was just a used car, 

and I was just a dumb kid . . . .