The Alfatross

The Alfatross
The Alfatross in 1965 and 50 years later in 2016

Wednesday, May 22, 2013

Carchaeology II (Post # 29)


Updates on Previous Posts

If you've been reading the posted comments you know that Jason Wenig of The Creative Workshop in Dania Beach, Florida (www.thecreativeworkshop.com) contacted me after reading the Keeping Cool post because the Ghia Aigle he is restoring for the Pebble Beach Concours was also missing its radiator shutter linkage.  I sent him my parts so he could copy them and in exchange  he will send me a radiator thermostat "widget" so I can replace the faulty one I have.  Win-win for all!  Both Jason and I are now beneficiaries of Ed Leerdam's generosity and trust when he loaned me his original linkage for duplication many years ago.  Thanks, Ed!

After reading the 39 . . . or 41 . . ? post, Peter Marshall wrote with very interesting updated information about the Alfatross' siblings which I will pass along in a future post.

Matteo Bosisio of Ruote Borrani, the source for my knock-off hubs mentioned in the Wheels and Spinners post, sent me addresses for knowledgeable people in both the Zagato and Alfa Romeo companies.  I will be making contact with them shortly in the hope that they can answer some persistent questions.

So I don't know how this blog is working for you, but for me it's becoming indispensable!

"Partifacts"

Why does a restoration take so long?   I am continually impressed with how well a career in marine archaeology has prepared me for restoration of the Alfatross.  Not only am I already accustomed to long hours spent in the tedious, repetitive, and seemingly endless task of cleaning and recording thousands of artifacts, but also familiar with the principle that unless you finish the job, there are no rewards!   
Archaeologists used small pneumatic chisels to clean the thousands of artifacts
from the Molasses Reef Wreck, the oldest shipwreck found in the Americas.
All the basic objectives and procedures are the same whether you are excavating a shipwreck site or restoring an old car.  In both cases you are dealing with thousands of individual "partifacts" made of different materials in different stages of deterioration that have to be put back together again. 

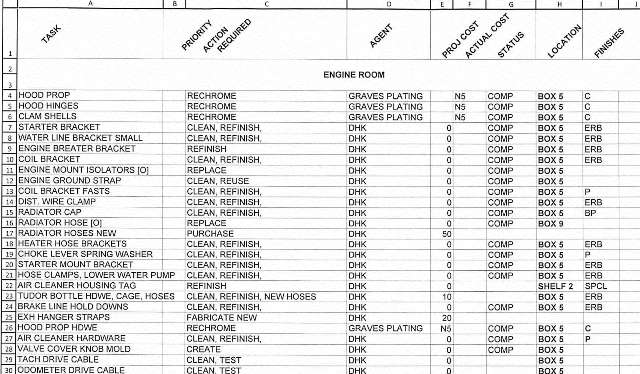
A few line items from my spreadsheet designed to keep track the Alfatross' "partifacts":
The Alfatross is made up of more than a thousand individual parts, each one of which has its own special identity and task to perform. Because each piece has to be cleaned, inspected, repaired, checked to make sure it works properly, and refinished, they all go in different directions for various types of treatment before being finally reunited and reassembled. Not surprisingly, no one can remember how all 1,000 pieces go back together, so if you don't use some kind of tracking system things can get out of control in a hurry.


What is it?  Where did it come from?  How do we know where
it goes after it is cleaned, inspected and checked?

Take this simple screw, for example. It is one of about 100 parts that make up the double wishbone left front suspension. I wouldn't remember that now because I took it apart about 10 years ago IF it weren't for the fact that I put every part in a Ziploc bag and labelled where it came from.

The next step was to photograph the artifact--oops, I mean part--on background paper printed with a grid of 1-inch squares to give some idea of scale.


The Alfatross' left front leg.  The screw above goes into the
middle of the spindle (cylindrical shape the axle is attached to)

So now we can actually start to work with the part because we have a record of its identity and where it came from. This one needs degreasing, so the first stop is a nice relaxing solvent bath in the heated, sonic degreaser.

. . . Followed by 24 hours in a vibratory tumbler filled with abrasive pyramids to take off corrosion and whatever else shouldn't be there. . .

. . . Followed by manual scrubbing with Scotchbrite pads under running water to get the abrasive off . . .
. . . Followed by another tour of duty in another vibratory tumbler, this time filled with corn cob granules, to give it a good as new shine (usually).


This old laboratory sonic cleaner cleaned a lot of  marine artifacts
before it took on a grease-heavy diet of filthy Alfatross parts.

Vibratory tumblers one, two, and three (wish I had about 3 more)!

Of course it would take forever to treat each part separately--but if you mix them together to speed up the process won't their identities get mixed up too? No, because the labelled bags and photo IDs follow each piece through the entire process.
Maintaining the spreadsheet takes a lot of time because when you move a part from one stage in the restoration process to the next, you have to update its status on the spreadsheet.  But I've had plenty of practice here, too.  Each artifact in one of our shipwreck sites has its own entry in a tracking system, and that information follows its conservation/restoration progress through to completion.  The artifact database stays with the actual artifact collection forever so that it can be consulted if problems arise in the future.
If this sounds like a lot of work, pity the poor marine archaeologist who might have to do the same things for hundreds of thousands of objects from a shipwreck! 


Monday, May 13, 2013

Where There's Smoke There's Wire (Post # 28)

For safety as well as aesthetic and functional reasons there are certain systems that almost invariably need replacement during an old car restoration.  In my last post I featured one of those systems: the five Plexiglas windows.  Rubber brake lines are another example, along with weatherstripping and various rubber and plastic seals.

As early as 1970, after wisps of smoke curled out from under the dash when I switched on the heater fan, I realized that the Alfatross' wiring might need improvement.  Later, during disassembly, it was apparent that the best course of action would be to replace the whole wiring harness.


Rats' nest or wiring harness?  Note the disintegrating insulation around the
component in the upper left corner 
Easier said than done (as usual).  There are a lot of wires in a car, even one like the Alfatross that was built almost 60 years ago.  The good news is that the wiring harness, the electrical circuits it represents, and the components it connects are moronically simple, compared to modern electronics.  The bad news is that they don't make components--or even wires--like these any more.  Time to call in the experts!

I put out a request for help in 1981 through Peter Marshall's Alfa Romeo 1900 Register and made contact with Hans Josefsson in Uppsala, Sweden.  Mr. Josefsson owned one of the Alfatross' siblings and was in the process of restoring it.  He must have been an engineer because he dissected the wiring circuits and produced a series of 9 beautiful schematics comprising the entire electrical system: instruments, starting and charging, service (wipers, heater fan, electric fuel pump), lighting, signalling, and braking!


The "Light Functions" schematic drawn by Hans Josefsson, one of 9 such
drawings covering the entire electrical system.


The layout for the dashboard electrical switches and components for 1900C SS Zagatos, taken from Josefsson's car. 

Armed with Josefsson's schematics I began the process of removing the wiring harness intact.  It would have been easier just to cut it and pull it out in pieces, but I needed it as intact as possible so I could reconstruct it.   

Removing the original wiring harness intact while labeling each of the connections was tedious, but absolutely necessary.
 Somewhere along the way I heard about an outfit called "YNZ: Yesterdays Parts"  (http://www.ynzyesterdaysparts.com/).  They supply exact replicas of original wiring harnesses and systems using identical parts and materials.  After 43 years of experience they amassed a catalog of wiring patterns for all sorts of vehicles--but not one for the Alfatross!  I sent them my original intact (but a bit tangled) harness and a check for $1,428 and in due course back came the new harness with labelled terminals along with a two-page list of circuits and clear drawings showing which wires attach to which terminals on which fuse blocks, switches, and relays.  
I asked Gene, the proprietor, to send me some photos of his shop so I could see how they make a new harness from an old one. All you need is the original to work from, a table as big as a car, about 200 nails, a whole lot of solder, and a thousand different types and gauges of wire with an equal number of terminals. 

That writhing mass of wires all over the top of the workbench is a harness for a '67 Lambo beginning to take shape. Notice how the wires are routed using nail "goalposts" to group them.

We're still a long way away from being ready to install the YNZ harness, so it's too soon to sing its praises, but I will say that it was a pleasure to work with Gene at YNZ and I will be surprised if it doesn't perform as advertised.  Their products carry a 100% refund guarantee up to 60 days after purchase.  No question, this is probably a task best entrusted to professionals!

Tuesday, May 7, 2013

Keeping It Light (Post # 27)

The Alfatross was built to race.  The faster, the better.  There are only two ways to make a car faster: increase the horsepower or reduce weight.  The Alfa engine was tweaked about as far as it could be, but it still made only a little over 100 HP.  These days a lot of production motorcycles make more HP that that, so getting the overall weight down was crucial.  There wasn't much they could do about the steel frame to lighten it, but making the body in aluminum instead of the normal steel dropped hundreds of pounds compared to a factory Alfa 1900.  Giving that body its svelte shape added the advantage of improved aerodynamics at high speeds.  On some cars even bumpers were deleted.  When they were present, they were aluminum. 

The interior, too, was put on a diet.  The aluminum dash probably weighs less than 5 lbs.  The tall, imposing central transmission hump is all aluminum.  The back seat is just a pad about three inches thick.  Of course there is no radio, no stereo system, no power windows, no air conditioning, and no handy drink holders, to name just a few items that used to be considered luxury accessories but are now standard.  The only items that could be considered accessories are the single sun visor for the driver and a rear view mirror in the center of the dash. 

The "skeletonized" driver and passenger seats weigh less than 30 lbs each. 


Beneath the simple seat cushions the only support is a band of
some kind of fabric stretched across the seat frame. Everything
you need to go fast . . . and nothing that you don't!

The third weight-saving strategy was to make all the windows except for the windshield out of Plexiglas instead of glass. This works brilliantly on a race car, but it also demonstrates vividly why there is a reason normal cars have glass windows instead of plastic--durability.  All the Alfatross' Plexiglas windows needed replacement due primarily to micro-cracks that can't be buffed out or cleaned away.  I had new ones made from the originals at a shop in Houston that makes windows for airplanes.  The door windows and back seat windows were easy, just fairly small pieces with simple gentle curves.  But the rear window is pretty large and has a compound curve.  I bet it's going to be a challenge to install.

This is one of the original Plexiglas rear seat windows.  After almost 60 years
it is hazy, cracked, and discolored.
 

And this is the way it's supposed to look.  Plexiglas is easy to scratch and you
shouldn't use glass cleaners on it.


The original drivers side window.  The long vertical scrapes on the right side that make the window almost opaque were created by an out-of-adjustment roller in the door.  That is something I will guard against when I reassemble it.


The new Plexiglas window is almost invisible in this view.
The windshield is more problematic than the Plexiglas windows.  It had no cracks or dings, but was marred by a long wiper scratch on the passengers' side that looked like it was too deep to polish away.  Should I try to replace it?  I was reluctant to take it out.  What if if breaks?  Where would I find another one?  So I did some research to find out how I would replace it if something went wrong.  Rich Heinrich put me touch with a company in Pennsylvania called ProCurve Glass that makes windshields.  The reply to my inquiry was a terse "2500 for 1, 3200 for 2  6 weeks." The Alfa 1900 Yahoo Groups source put me in touch with Antti Wihanto whose company in Turko, Finland, also makes windshields to specification and has lots of patterns on hand.  His prices were competitive, but what about shipping by air?

The problem in both cases is that you can't make a windshield without a pattern, and there is enough variation between individual Zagatos to make you wonder if the patterns that exist will work for your particular car.  The windshield itself is cheap.  Making the pattern is the expensive part.  The best way to get a good result is to send your windshield to whichever company you pick so they can check for a pattern match, or if there is no match, make a new pattern just for your car.  Here's where it gets both expensive and risky.  How do you pack a windshield for shipment to Pennsylvania or Finland?  It's going to have to go by air, so how much is that going to cost?  And you might as well make two at the same time in case one gets broken later.  And then you have to fly the original and at least two copies back . . . cha-ching!


The Alfatross' windshield packed for transportation from Corpus Christi, Texas, to Santa Fe.
The only problem: a wiper scratch on the passengers' side.  How much of it can be removed by polishing?  Is it bad enough
to warrant replacement? 
In the end, the windshield came out without damage, but of course the wiper scratch was still there.  If the scratch can't be polished out, does replacing the windshield for clarity's sake outweigh keeping it for originality's sake?  It's a decision that has to be made soon so that the windshield--whether original or new--doesn't hold up reassembly of the Alfatross. 

Tuesday, April 30, 2013

No Pressure! (Post # 26)

The pressure is on! And it's such a relief!

A few weeks ago the blog was all about finally getting the Alfatross up on the rotisserie so it could be soda blasted and move to the next preparation stage.  This post is about why it has taken so long to get back to that. Soda blasting needs three things: soda, a rotisserie, and plenty of compressed air.  Make that four things: add cooperative weather.  A month ago I had all four--briefly--and the result was rapid progress stripping the old paint and filler off the Alfatross' body.  But the diesel-powered compressor was rented ($200/day!) and this time of year in Northern New Mexico the weather can't decide if it is winter or summer.  The only thing you can count on is the wind: plenty of it and all day long.

Suffice it to say that there were delays . . . .


So this is what I went to school all those years for?

Speaking of wind, I knew I needed to replace my aging, feeble, low-volume, low pressure reciprocating air compressor with something more robust.  Soda blasting doesn't need all that much pressure, maybe only about 100 PSI.  But it does need volume--like something north of 30 CFM!  Just to put that in perspective, a telephone booth (anybody still remember them?) has a volume of about 80 cubic feet.  So a compressor capable of producing 30 cubic feet of air per minute at 100 PSI (which is 6.8 times normal air pressure at sea level) could fill 2 1/3 telephone booths per minute.  It would take you about 5 hours to breath that much air . . . and the compressor has to make it in one minute!
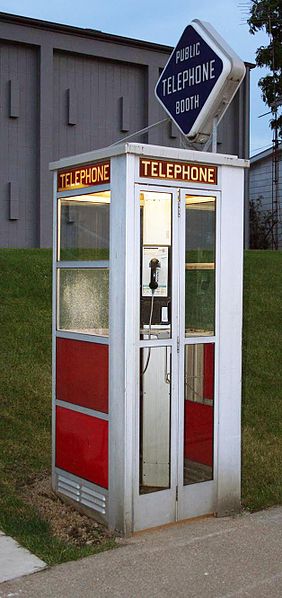
File:ClassicTelephoneBooth.jpgOK, that didn't sound as impressive as I thought it would. What IS impressive is what compressors like that cost! In the first place volume and pressure are only two of many considerations when you're compressor shopping. The next consideration in importance for me was noise.

Your typical "reciprocating" shop compressor uses an electric motor to move pistons or diaphragms to compress air, like an internal combustion engine turning over on its electric starter before ignition takes place. They can be deafening.

Other considerations include power consumption (or "efficiency"), space needed, configuration of storage tank (vertical or horizontal), duty cycle design specification, and of course maintenance costs. 

Reciprocating and "rotary screw" compressors are the most common types, but I ran across another variant called "Hydrovane" that intrigued me.  Reciprocating compressors that would do the job were out of the question because the racket they would make in my little shop would be unbearable.  Rotary screw jobs are great, but one that could make the pressure and volume I was looking for would cost close to $10,000!  The hydrovane boasted direct drive (no belts), low rotational speed, low noise, continuous duty, improved efficiency over time (!?), and lower cost (more like $4,000 before shipping, etc.). 

I was immediately attracted to the Hydrovane principle because it reminded me of the rotary engine in my Mazda RX-8 in reverse. In both cases you have rotors instead of pistons as the only moving parts,and chambers instead of cylinders (the Hydrovane calls them "stators").

Schematic of the Hydrovane principle.  The rotor is in the center, mounted
off-center in the stator.  It is the only moving part unless you count the
vanes moving in and out of their slots under centrifugal force.


After talking to the local distributor, Brian Page of WISCO Supply, Inc., I was sold.  It arrived about three weeks later in an 18-wheeler that somehow found its way to my shop.  You can't just plug one of these babies in.  When I built the shop I anticipated needing a couple of 220v outlets, but I still needed Manuel Serrano to wire it in, install a cutoff switch box and breakers. 

Here's where it gets interesting.  His guys did the job in 2 hours, but I still had to wait for WISCO to send a start up team up from Albuquerque to look the system over for warranty purposes. 

Miguel Serrano's guys swarming all over the Hydrovane, wiring it in to code.  220V appliances need to be taken seriously!
Long story short, WISCO's guys drove the 70 miles up from Albuquerque, inspected everything, threw the switch--and promptly blew the two gigantic main fuses in the compressor's control box!  Turns out they were special.  You can't find fuses like that in Santa Fe. So they drove the 70 miles back to Albuquerque and returned the next day with the proper replacements.  After mulling things over, they realized that Serrano's electricians had connected line power to the wrong place in the control box.  I don't know why they missed that the first time.  They rewired it, threw the switch again--and the Hydrovane sprang to life at last!  It was smooth, it was quiet, and automatically cut off at 150 PSI.  Perfect--except for the fact that I had to pay twice as much for the electrical work done by two different groups of electricians, each of which made bad mistakes. 

Maybe they both should advertise: "We charge twice as much to do it wrong the first time!"

Caveat Emptor!

Ready for action at last.  More power!  More air!  Small footprint and very quiet.  Highly recommended--just make sure it's
wired in right to start with!

Tuesday, April 23, 2013

The Alfatross meets The Phoenix (Post # 25)

So you're restoring your old car.  You can do a lot of the scut work yourself: disassembly, assembly, cleaning, polishing, painting some of the small parts, etc.  But there are a lot of tasks that require special tools, knowledge, and experience.  The last post about the electric fuel pump was a good example.  There are many more such tasks from wire wheel renovation to replicating the wiring harness.  But the three 800-lb gorillas in the room are the engine, the interior, and the body. 

Phoenix, Arizona, built on the ruins of the ancient Hohokam
 culture, was named for the mythical bird that rose from its
own ashes to live again. 
Phoenix, Arizona is a good place for an old Alfatross to rise from its own ashes and live again.  That's where I went last week.  Not only is Phoenix steeped in the American Car Culture and home of the most famous car auctions in the world (last winter sales totalled $225 million!), but also a great place to find specialist car services. 

The Alfatross's connection with The Phoenix started in 2004 when I invited Rich Heinrich to visit us in Corpus Christi.  He worked for a private car collection in Phoenix where he was tasked with the restoration of another Alfa SSZ like mine.  Because the Alfatross was more complete he could take photos and measurements that would result in a better restoration of the car he was working on. 

We kept in touch over the years.  Every time I was in Phoenix I made a point of visiting him and the other guys working in the restoration shop attached to the private collection.  When it came time to get serious about restoring the Alfatraoss I went to them for advice.  After a very disappointing experience with an alleged Alfa 1900 engine specialist in St. Louis, I decided last year to take my engine to DeWayne Samuels, one of Rich's co-workers in Phoenix. 

Last week I flew down to Phoenix to check on the progress being made on the engine, and while I was there, look for a shop that could paint the Alfatross's body.  I was met at the airport by my old schoolmate Dr. Randy Davis, who volunteered to be the wheel man for a long day of fighting traffic from one end of Phoenix to the other and back again.   The first stop was Roger Lorton's Standard Machine, LLC.  There, the engine was completely disassembled, cleaned, and evaluated.  It was time to make sure Roger, DeWayne and I were all on the same page with respect to concerns such as originality, performance upgrades, and appearance.  As expected, the engine needs some machine work and new parts: new exhaust valves and pistons, and machining of the valves, valve seats, and possibly crank.  The good news is that the block, head, and connecting rods are all OK along with the cam chain and oil pump gears.  How long will it take and what will it cost?  Still too soon to tell.

Roger Lorton with one of the many special machines used for precision seating of valves in a cylinder head.  Note the "floating" base.  Roger and DeWayne have worked together on various engine restoration projects over the years ranging from big-block V-8s to a straight-8 Bugatti!

The Aflatross's 58 year-old aluminum cylinder head.  Condition is pretty good except for some minor scaring in one of the
combustion chambers.  I have new intake valves already, but will need a new set of exhaust valves.

The crank is in pretty good condition too, but the main bearing surfaces all show varying degrees of wear and will have to  be hard-chromed.  New pistons will have to be fabricated.  Balance has yet to be checked.
I wasn't looking forward to the other item on my list, finding a shop that could give the Alfa a great paint job.  Most body shops only accept insurance repair work, so what we were looking for was something completely different and a lot harder to find.  Rich suggested that we pay a visit to Young Guns Designs (http://younggunsdesigns.com/).  There we met the owners, Tyler Tibbits and John Pollock, who spent more than an hour taking us through their facility.  Unfortunately, I didn't have my camera so I have no photos to post, but their Web site and numerous You Tube segments will give you a good idea of what they can do.  We were very impressed by their facility, professionalism, enthusiasm, experience, and raw talent. 

I will have to send photos and documents to familiarize them with the Alfatross, my schedule, and expectations so they can mull it over before going any farther. 

The Phoenix keeps calling The Alfatross.  Perhaps one day the Alfatross will be part of the auction scene in nearby Scottsdale . . . .


Tuesday, April 16, 2013

Giving It the Gas Post # 24)

The Alfatross has two fuel pumps: an electric SU pump mounted under the car near the fuel tank and a mechanical FISPA pump mounted on the right side of the engine.  Both were in pretty good condition other than having old, hard diaphragms and gaskets.  The latter, being simple and mechanical, was easy to restore, but the SU was another story.  In the first place, it had a lot of parts. 

The SU fuel pump is a beautiful device, but subject to
failure of the electrical contact points switch.
I surfed the Internet looking for specifications and parts for SU pumps and discovered Dave DuBois at SU Fuel Pumps and More (http://homepages.donobi.net/sufuelpumps/).  After reading his articles on SU fuel pumps I realized that not only could Dave supply the parts I needed, but could also replace the original stone-age "contact points" technology with an optical triggering device that would dead-reliable. 

I sent my pump to Dave and it was one of the best experiences I have had with sub-contractors.  The information about SU pumps on his Web site is encyclopedic.  He tells you exactly what your pump needs and what he will do to restore it.  He tells you how your pump will be tested following restoration and that he keeps a copy of the data on your pump on file for future reference.  The prices for his services are clearly stated, along with shipping charges and optional insurance.

For me, the icing on the cake was the photo of Dave's testing station.  I always ask sub-contractors to provide a photo or two of their workshop, just to have a more complete record of all the work that is being done on the Alfatross's parts outside my own workshop.  Most of them don't do it.  I don't know why, in this day and age of cell phone cameras, they can't be bothered to send back a snap or two along with the item they're restoring, but they don't.  Anyway, Dave has that covered, too.


Dave DuBois' test station.  Impressive!

Dave's solid-state replacement for the original points. 
This type of modification during restoration is in line with my overall restoration philosophy: yes, it is a departure from 100% originality, but it is unobtrusive, undetectable, and it improves reliability.  For me this is an acceptable compromise. 

The finished electric fuel pump, tested and ready for installation.

So my pump was returned run-tested and in better-than-new condition.  It has a one year warranty on parts and a lifetime warranty on labor!  All this for just $121.62 including shipping, or $127.32 if you want the  $400 insurance option (as of 2012).  He also lists other SU repair services you can contact in the US, the UK, and Australia.  Now that's the kind of contractor you want to deal with.

Thanks, Dave!

Tuesday, April 9, 2013

Carchaeology (Post # 23)

Almost every day I am reminded of the parallels between archaeology, my vocation, and carchaeology, my avocation.  the similarities are broad and deep.  Broad in the sense that both deal with old objects that need to be researched and restored so you can show them to the public and explain their significance.  Deep in the sense that the physical and chemical processes involved in stabilizing the artifact and preventing further deterioration are exactly the same.  Then there is the element of research.  In both archaeology and carchaeology we are dealing with things made in the past that we are bringing back to life. 

Archaeology

Most of our archaeological work involves objects that have been submerged in seawater for centuries, like the cannon below.  That's a pretty harsh environment but under the right conditions all sorts of things can survive in surprisingly good condition.  We call the condition they are in when found their "state of preservation."  We call what we do to the objects after recovering them from the sea "conservation treatment."  Different materials require completely different types of conservation treatments.  All of this applies to old cars as well. 

A bronze cannon fresh from a shipwreck site in its natural "state of preservation."

The same cannon months later following extensive conservation treatments
including pressure-washing and electrolytic reduction .
What do you do when you have an important artifact but parts of it are missing?  This is where research comes in.  The bronze cannon provides a good archaeological example.  The cannon was in great shape, but the iron, wood, and rope artifacts that made up the cannon carriage were gone.  We knew that in order to maximize the visual and educational impact of the cannon we would need to reproduce the missing pieces.  Using construction plans for cannon carriages of the period found in French archives we were able to replicate all the missing pieces authentically. 

The same cannon months later, after extensive historical research enabled
us to replicate the carriage, ropes, pulleys, iron hardware, deck and
gun port necessary to put the cannon in its proper context.

Carchaeology

An old car is like an archaeological site. All its bits and pieces are the individual "artifacts" that make up the "site."  Before going to the trouble and expense of restoring a car, the carchaeologist, just like the archaeologist, should have a pretty good idea of what the final product will be.  If not, there is a good chance the project will drift toward the path of least resistance and lose sight of the goal.

I'm at the stage now where I cannot proceed without finalizing my vision for the Alfatross' future. Because the Alfatross is already well on its way to some form of restoration, and the "preservation" mode is not an option, there are three basic paths to follow:
  1. Restore for concours competition,
  2. Restore to a somewhat lower standard for participation in actual classic car driving events,
  3. Or restore and modify to suit my own personal driving and enjoyment preferences.


Option 1 is to restore the Alfatross to a very high standard down to the last nut
and bolt, foregoing performance upgrades and interior embellishments,
establish its previous competition history (if any) and actually drive it
as little as possible.

Option 2 is to prepare the Alfatross for long-distance vintage racing  and
rallying.  Emphasis would be on a reliable, powerful engine, strong suspension
and brakes and driver comfort.

Option 3 is "suit yourself!" Would a small block V8 fit in the engine room? 
How about some 18-inch mag wheels with fat tires?
In all honesty, Options 1 and 3 are not attractive to me.  Judging from the results of concours events I am familiar with, the Alfatross just isn't a good candidate.  Sure, 1900C SSZs are elegant and rare, but underneath that sexy Zagato body they're pretty plain and simple, particularly the interiors.  They weren't star race-winners in period, either.  I'm still not sure how the Alfatross' authenticity compares with its brethren.  It is the most original of the examples I have seen, but there are many that I haven't. 

Option 3 is equally unappealing for the simple reason that the Alfatross is an important artifact--part of automotive history and design--and as such I am responsible for preserving its integrity until it passes to the next owner.  So no hot-rodding allowed!

That leaves Option 2 as the best course for me to follow with the Alfatross' restoration.  It also seems to have been the same choice that many other owners of 1900 Zagatos have made.  So the goals for the Alfatross are going to be :
  • restore and re-use original parts wherever possible
  • replace original parts where function or safety may be compromised (rubber brake lines,brake shoes, tires, Plexiglas windows)
  • duplicate original finishes and materials where originals have deteriorated (paint, upholstery, Plexiglas, rubber and plastic) 
  • rebuild engine, drive train and brakes with attention to robustness
  • research and document history 
So now that we have a goal . . . back to work!