 |
| Exhaust ports are finally installed in the overhead door just in time for winter. |
It's February 2nd and winter is making itself felt. Winters can be long up here in the mountains of northern New Mexico. This year is turning out to be relatively mild so far, but snow has been on the ground for the last several weeks and February is usually the coldest month. Over the years I have put a lot of effort into making The Shed a comfortable place to work no matter what the weather conditions, and that has paid off. Last week I completed a project that has been on the list for a long time but finally reached the top of the priority list: making it possible to run The Alfatross indoors by venting the exhaust through sealed ports in the overhead door. The project was made a little more complicated by the small diameter of The Alfatross' dual tailpipes.
 |
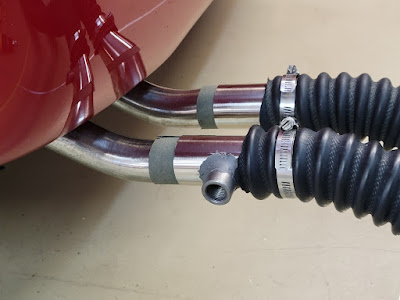
| Mating the exhaust hoses to The Alfatross' tailpipes. |
The first task was to locate small diameter flexible exhaust hoses that could be mated to The Alfatross' tailpipes at one end and whatever I could cobble together at the door. When my on-line search for a "plug and play" solution was fruitless I turned to my junk boxes for inspiration and was immediately rewarded.
 |
| Steel materials junk box. |
 |
| Adapting tailpipe to exhaust hose. |
The OD of The Alfatross' pipes is 42.34mm but the ID of the flexible hose, at 50.8mm, is too large, so I needed an adapter. My junk box for steel items coughed up a pair of short chrome exhaust tips exactly the right OD to fit the ID of the hose and almost exactly right to fit over The Alfatross' tailpipes. The junk box for gasket and seal materials delivered 0.85mm strips of material that not only sealed the tiny gap between the tips and tailpipes, but also prevented the chrome tips from scratching the tailpipes.
 |
| The 4 piece PVC door penetration and cap. |
At the door end of the exhaust hoses I needed something with an ID that would seal tightly with the hoses and an OD that would seal with the door--and mate with some kind of plug that would close it off when not in use. For this I turned to my PVC junk box and discovered that all my problems could be solved by cutting 60mm holes through the insulated door and sandwiching lengths of 2" schedule 40 PVC pipe between 2" PVC couplings. The hoses fits snugly inside the interior couplings ID's and the exterior couplings hold the assemblies tightly in place. A cap with a wide flange seals them off when not in use.
Pleased with myself for figuring out how to solve this problem, I quickly bored holes in the insulated overhead door and installed the vents. When I operated the door I was relieved to see that the exterior PVC couplings cleared the top of the door opening . . . but dismayed when the door reversed itself because I mounted them in the path of the safety light beam! It was easy enough to correct by drilling new holes higher up on the door and making plates to cover the original holes, but what a rookie mistake!
 |
| LM-2 fuel/air sensor bung |
It wasn't long before I realized that I would not be able to use the LM-2 fuel/air analyzer's portable sensor with this arrangement and would have to modify one of the chrome pipe tips to install the sensor bung. Another easy fix, but I should have thought of that earlier too.
I did not want to challenge my rudimentary welding skills by trying to mate the heavy iron bung onto the very thin steel tip, so I drilled a hole in the tip, ground a saddle shape into the end of the bung and secured it in place with JB Weld's Extreme Heat formula.
 |
| Interior aspect |
 |
| Exterior aspect |
Now, what's next on the priority list? Oh yeah--back to work on the car: Solex carburetor tuning, Zagato family matters, addressing oil leaks, historical research, radiator overflow tank installation, road worthiness testing, concours participation, preparing for sale . . . .


Looks good! Adaptability to unexpected consequences......forever the true nature of everything within an unknown duration of time.
ReplyDelete