The Alfatross

The Alfatross
The Alfatross in 1965 and 50 years later in 2016

Tuesday, April 23, 2013

The Alfatross meets The Phoenix (Post # 25)

So you're restoring your old car.  You can do a lot of the scut work yourself: disassembly, assembly, cleaning, polishing, painting some of the small parts, etc.  But there are a lot of tasks that require special tools, knowledge, and experience.  The last post about the electric fuel pump was a good example.  There are many more such tasks from wire wheel renovation to replicating the wiring harness.  But the three 800-lb gorillas in the room are the engine, the interior, and the body. 

Phoenix, Arizona, built on the ruins of the ancient Hohokam
 culture, was named for the mythical bird that rose from its
own ashes to live again. 
Phoenix, Arizona is a good place for an old Alfatross to rise from its own ashes and live again.  That's where I went last week.  Not only is Phoenix steeped in the American Car Culture and home of the most famous car auctions in the world (last winter sales totalled $225 million!), but also a great place to find specialist car services. 

The Alfatross's connection with The Phoenix started in 2004 when I invited Rich Heinrich to visit us in Corpus Christi.  He worked for a private car collection in Phoenix where he was tasked with the restoration of another Alfa SSZ like mine.  Because the Alfatross was more complete he could take photos and measurements that would result in a better restoration of the car he was working on. 

We kept in touch over the years.  Every time I was in Phoenix I made a point of visiting him and the other guys working in the restoration shop attached to the private collection.  When it came time to get serious about restoring the Alfatraoss I went to them for advice.  After a very disappointing experience with an alleged Alfa 1900 engine specialist in St. Louis, I decided last year to take my engine to DeWayne Samuels, one of Rich's co-workers in Phoenix. 

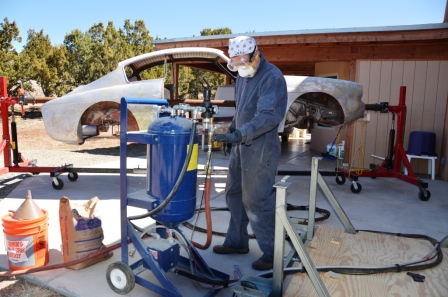
Last week I flew down to Phoenix to check on the progress being made on the engine, and while I was there, look for a shop that could paint the Alfatross's body.  I was met at the airport by my old schoolmate Dr. Randy Davis, who volunteered to be the wheel man for a long day of fighting traffic from one end of Phoenix to the other and back again.   The first stop was Roger Lorton's Standard Machine, LLC.  There, the engine was completely disassembled, cleaned, and evaluated.  It was time to make sure Roger, DeWayne and I were all on the same page with respect to concerns such as originality, performance upgrades, and appearance.  As expected, the engine needs some machine work and new parts: new exhaust valves and pistons, and machining of the valves, valve seats, and possibly crank.  The good news is that the block, head, and connecting rods are all OK along with the cam chain and oil pump gears.  How long will it take and what will it cost?  Still too soon to tell.

Roger Lorton with one of the many special machines used for precision seating of valves in a cylinder head.  Note the "floating" base.  Roger and DeWayne have worked together on various engine restoration projects over the years ranging from big-block V-8s to a straight-8 Bugatti!

The Aflatross's 58 year-old aluminum cylinder head.  Condition is pretty good except for some minor scaring in one of the
combustion chambers.  I have new intake valves already, but will need a new set of exhaust valves.

The crank is in pretty good condition too, but the main bearing surfaces all show varying degrees of wear and will have to  be hard-chromed.  New pistons will have to be fabricated.  Balance has yet to be checked.
I wasn't looking forward to the other item on my list, finding a shop that could give the Alfa a great paint job.  Most body shops only accept insurance repair work, so what we were looking for was something completely different and a lot harder to find.  Rich suggested that we pay a visit to Young Guns Designs (http://younggunsdesigns.com/).  There we met the owners, Tyler Tibbits and John Pollock, who spent more than an hour taking us through their facility.  Unfortunately, I didn't have my camera so I have no photos to post, but their Web site and numerous You Tube segments will give you a good idea of what they can do.  We were very impressed by their facility, professionalism, enthusiasm, experience, and raw talent. 

I will have to send photos and documents to familiarize them with the Alfatross, my schedule, and expectations so they can mull it over before going any farther. 

The Phoenix keeps calling The Alfatross.  Perhaps one day the Alfatross will be part of the auction scene in nearby Scottsdale . . . .


Tuesday, April 16, 2013

Giving It the Gas Post # 24)

The Alfatross has two fuel pumps: an electric SU pump mounted under the car near the fuel tank and a mechanical FISPA pump mounted on the right side of the engine.  Both were in pretty good condition other than having old, hard diaphragms and gaskets.  The latter, being simple and mechanical, was easy to restore, but the SU was another story.  In the first place, it had a lot of parts. 

The SU fuel pump is a beautiful device, but subject to
failure of the electrical contact points switch.
I surfed the Internet looking for specifications and parts for SU pumps and discovered Dave DuBois at SU Fuel Pumps and More (http://homepages.donobi.net/sufuelpumps/).  After reading his articles on SU fuel pumps I realized that not only could Dave supply the parts I needed, but could also replace the original stone-age "contact points" technology with an optical triggering device that would dead-reliable. 

I sent my pump to Dave and it was one of the best experiences I have had with sub-contractors.  The information about SU pumps on his Web site is encyclopedic.  He tells you exactly what your pump needs and what he will do to restore it.  He tells you how your pump will be tested following restoration and that he keeps a copy of the data on your pump on file for future reference.  The prices for his services are clearly stated, along with shipping charges and optional insurance.

For me, the icing on the cake was the photo of Dave's testing station.  I always ask sub-contractors to provide a photo or two of their workshop, just to have a more complete record of all the work that is being done on the Alfatross's parts outside my own workshop.  Most of them don't do it.  I don't know why, in this day and age of cell phone cameras, they can't be bothered to send back a snap or two along with the item they're restoring, but they don't.  Anyway, Dave has that covered, too.


Dave DuBois' test station.  Impressive!

Dave's solid-state replacement for the original points. 
This type of modification during restoration is in line with my overall restoration philosophy: yes, it is a departure from 100% originality, but it is unobtrusive, undetectable, and it improves reliability.  For me this is an acceptable compromise. 

The finished electric fuel pump, tested and ready for installation.

So my pump was returned run-tested and in better-than-new condition.  It has a one year warranty on parts and a lifetime warranty on labor!  All this for just $121.62 including shipping, or $127.32 if you want the  $400 insurance option (as of 2012).  He also lists other SU repair services you can contact in the US, the UK, and Australia.  Now that's the kind of contractor you want to deal with.

Thanks, Dave!

Tuesday, April 9, 2013

Carchaeology (Post # 23)

Almost every day I am reminded of the parallels between archaeology, my vocation, and carchaeology, my avocation.  the similarities are broad and deep.  Broad in the sense that both deal with old objects that need to be researched and restored so you can show them to the public and explain their significance.  Deep in the sense that the physical and chemical processes involved in stabilizing the artifact and preventing further deterioration are exactly the same.  Then there is the element of research.  In both archaeology and carchaeology we are dealing with things made in the past that we are bringing back to life. 

Archaeology

Most of our archaeological work involves objects that have been submerged in seawater for centuries, like the cannon below.  That's a pretty harsh environment but under the right conditions all sorts of things can survive in surprisingly good condition.  We call the condition they are in when found their "state of preservation."  We call what we do to the objects after recovering them from the sea "conservation treatment."  Different materials require completely different types of conservation treatments.  All of this applies to old cars as well. 

A bronze cannon fresh from a shipwreck site in its natural "state of preservation."

The same cannon months later following extensive conservation treatments
including pressure-washing and electrolytic reduction .
What do you do when you have an important artifact but parts of it are missing?  This is where research comes in.  The bronze cannon provides a good archaeological example.  The cannon was in great shape, but the iron, wood, and rope artifacts that made up the cannon carriage were gone.  We knew that in order to maximize the visual and educational impact of the cannon we would need to reproduce the missing pieces.  Using construction plans for cannon carriages of the period found in French archives we were able to replicate all the missing pieces authentically. 

The same cannon months later, after extensive historical research enabled
us to replicate the carriage, ropes, pulleys, iron hardware, deck and
gun port necessary to put the cannon in its proper context.

Carchaeology

An old car is like an archaeological site. All its bits and pieces are the individual "artifacts" that make up the "site."  Before going to the trouble and expense of restoring a car, the carchaeologist, just like the archaeologist, should have a pretty good idea of what the final product will be.  If not, there is a good chance the project will drift toward the path of least resistance and lose sight of the goal.

I'm at the stage now where I cannot proceed without finalizing my vision for the Alfatross' future. Because the Alfatross is already well on its way to some form of restoration, and the "preservation" mode is not an option, there are three basic paths to follow:
  1. Restore for concours competition,
  2. Restore to a somewhat lower standard for participation in actual classic car driving events,
  3. Or restore and modify to suit my own personal driving and enjoyment preferences.


Option 1 is to restore the Alfatross to a very high standard down to the last nut
and bolt, foregoing performance upgrades and interior embellishments,
establish its previous competition history (if any) and actually drive it
as little as possible.

Option 2 is to prepare the Alfatross for long-distance vintage racing  and
rallying.  Emphasis would be on a reliable, powerful engine, strong suspension
and brakes and driver comfort.

Option 3 is "suit yourself!" Would a small block V8 fit in the engine room? 
How about some 18-inch mag wheels with fat tires?
In all honesty, Options 1 and 3 are not attractive to me.  Judging from the results of concours events I am familiar with, the Alfatross just isn't a good candidate.  Sure, 1900C SSZs are elegant and rare, but underneath that sexy Zagato body they're pretty plain and simple, particularly the interiors.  They weren't star race-winners in period, either.  I'm still not sure how the Alfatross' authenticity compares with its brethren.  It is the most original of the examples I have seen, but there are many that I haven't. 

Option 3 is equally unappealing for the simple reason that the Alfatross is an important artifact--part of automotive history and design--and as such I am responsible for preserving its integrity until it passes to the next owner.  So no hot-rodding allowed!

That leaves Option 2 as the best course for me to follow with the Alfatross' restoration.  It also seems to have been the same choice that many other owners of 1900 Zagatos have made.  So the goals for the Alfatross are going to be :
  • restore and re-use original parts wherever possible
  • replace original parts where function or safety may be compromised (rubber brake lines,brake shoes, tires, Plexiglas windows)
  • duplicate original finishes and materials where originals have deteriorated (paint, upholstery, Plexiglas, rubber and plastic) 
  • rebuild engine, drive train and brakes with attention to robustness
  • research and document history 
So now that we have a goal . . . back to work!

Tuesday, April 2, 2013

Keeping Cool (Post # 22)

What takes the most time in a restoration?  A lot of categories vie for that honor, but at the moment I would say it is "details."  If you pay attention to the details and do things right, it will be worth it later on, but while you're actually doing it there is a little voice whispering "Is this really necessary?"  Who is ever going to see it, and even if they do, how would they know the difference?

Case in point is the harmless-looking widget below.  When I disassembled the engine room it was embedded in the top tank of the Alfatross' radiator with just the small shaft sticking out.   What the . . . ?   Immediately in front of the radiator was a louvered frame, obviously meant to open and close to assist warming up the engine.  A rod on a pivot was attached to the middle of the top louver and the others were linked to it to follow its motion.  I reasoned that the widget had at one time been connected somehow to the louvers, but there was nothing there now.  The louvers were wired up in the full open position.

The radiator widget.  The numbers in the upper left corner of this photo are
stamped into the bronze body.  IPRA is probably the manufacturer.  The  "4"
above is probably a size and the numbers below are probably the temperature
ranges at which it opens and closes the louvers as the
water in the radiator warms up.

Here's the louver frame that sat in front of the radiator.  The rod in the middle
of the top louver was intact, but how did it connect to the widget?
For many years I was at a loss to find a replacement widget or figure out how the linkage between it and the louver box worked.  The breakthrough came when I saw the car below at a show in 2002.  It had only recently come to light and was on display as an exciting new "barn find."  While other spectators were admiring the remarkably intact interior and engine room, I was peering through the narrow openings in the nose to see if the louver actuating linkage was still there.  It was!

The car that solved the mystery.
Normally, it would have been impossible to photograph the linkage, but as luck would have it the car was missing the grill frames on either side of the central grill and the unobstructed openings were just big enough to get my digital camera inside.  The photos revealed that the linkage was intact and operational, which was great, but also that it consisted of no less than 9 parts and was not the sort of thing that could be duplicated from photos alone. 

Here is the 9-part linkage in the barn find car.  The widget is invisible inside the
radiator.  As the coolant in the radiator heats up, something inside the widget
 expands and pushes the end shaft out against a roller mounted on the lever arm.
 The spring helps to push the end shaft back into the widget as the radiator cools.
I figured that finding an intact, operational, linkage assembly like this was unlikely, but maybe the owner of this car would be willing to take it off and send it to me so I could duplicate it for my car-especially if I sent him my front grill frames so he could duplicate them for his car!  And that's exactly what we did. 

In addition to lots of photos shot from every angle, it was critical to record all the dimensions and types
of metals used: bronze for the lever arm, spring steel for the spring, brass for the rivets, mild steel
for the cotter keys, and hard steel for the roller and axle.


Recording the linkage assembly was the easy part.  Making it was hard.  The lever arm was the hardest part to duplicate because it was a solid piece that had to be cast.  I didn't want to send the original to a foundry, so in addition to photographs and dimensions, I also made a mold of the roller and lever arm assembly and cast it in resin.  I sent this to the foundry for final casting.


The resin cast of the lever arm that was sent to the foundry for duplication in
bronze. 
The next challenge was the spring.  I knew I couldn't do this myself, so I farmed it out to a specialty spring maker in Corpus Christi.  I was astounded at the cost estimate: $250!   It was the last spring they ever made.  When I went to pick it up the owner was locking the doors and closing up shop for good.  I guess that even at $250 each the specialty spring market is pretty thin.

How do you measure a spring, anyway?  The important is figuring out its "springiness"
So the Devil really is in the details.  All this, spread out over about 10 years, for a part that would fit in the palm of your hand, a part that the car really doesn't have to have and few would notice the difference if it didn't . . .

. . .  and I'm still trying to figure out how to open the widget to rebuild it!


Tuesday, March 26, 2013

The 39 . . . or 42 . . . or . . . ? (Post # 21)

The blasting soda still hasn't shown up, but even if it had I couldn't use it today--we've had 30 mph winds all day.  So maybe this is a good time to talk about the Alfatross' family history.  One of the things that makes the Alfatross and its siblings valuable is rarity.  But exactly how rare are they, really?  If we start with the available records for how many 1900C Alfa Romeos were clad in Zagato bodies it seems to be between 39 and 42, but there are some discrepancies.  The table below is my compilation of the Alfatross' siblings listed by chassis number, year of production, Zagato body number (where known), year it ran in the Mille Miglia, current owner, country of residence, and most recent date of my information about the car.  You will notice that for the majority of the cars ownership information is quite out of date (1990) so some will have changed hands over the last 20 years. 

 Alfa Romeo 1900 chassis bodied by Zagato 1954-1958.  Information
courtesy ot Peter Marshall and Michele Marchiano.

The table reveals some interesting details.  The U.S. has 7 cars, more than any other country.  Most of the cars were produced in 1954 (21), another 14 were produced in 1955, only 3 or 4 were produced in 1956, none in 1957, and 1 or 2 in 1958.  Curiously, chassis no. 01931 is listed as an entrant in the 1955 Mille Miglia, but is not listed in Zagato's records as one of its cars. Chassis 01844 is notable for having run in the '55, '56  and '57 Mille Miglia.  I also notice that its Zagato body number, 1254, is strangely out of sequence when compared to the other Zagato body numbers that are known.  Numbers 40 and 42 are listed as "spyder SSZ," apparently prototypes built for car shows.  Sr. Marchiano writes "It seems that both of these cars have disappeared."


These cars were built to race, and race they did!


Unlike the Alfa Romeo chassis and engine numbers, which are indelibly stamped into steel, the Zagato number is unceremoniously scrawled in pencil on the back side of a plywood trim piece above the windshield.  It is very easily lost, so these cars tend to be differentiated by their Alfa Romeo chassis numbers rather than their Zagato numbers, even though the Zagato bodies are what make them unique.

The Zagato body number for my car.  Written in pencil, almost as an afterthought, it says "Alfa No 1209."

A car with verified racing history is usually valued higher, all things being equal.  When I compared the list of chassis numbers bodied by Zagato with cars known to have entered the Mille Miglia, the most famous road race of all time, between '54 and '57 there were only five, but the actual number is likely to be a higher.  Mille Miglia records for those years show a lot of entries listed simply as "1900 SSZ," without chassis numbers given.  In addition to the 5 known 1900 SSZs entered in 1955 there were 3 listed as "1900Z."  In 1956 there were 3 cars listed as "1900 SSZ" and in 1957 there were 4 listed the same way in addition to remarkable car 01844 that ran all three years. 


At the starting line of the XXII Mille Miglia.  The 1900 SSZ driven by Galluzzi
with Ippocampo as navigator.
Significantly, only one car, no. 01908, is known to have been destroyed. If the two spyders have disappeared that leaves 39 cars unless number 01931 is the result of a mistake made by Mille Miglia record-keepers, in which case we are downto 38. Fourteen cars have no information available other than that they were bodied by Zagato. Are they still in existence? How many real cars are left? My list shows that only 28 cars are known to exist, but I expect there are others. If anyone out there can help fill in the blanks, I'm sure all legitimate owners would appreciate it. I say legitimate because some say there are a number of "copies" now on the market (see http://www.ar1900reg.org/index.cfm.) known collectively as "fauxgatos."

Imitation is the sincerest form of flattery?

Another 1900 SSZ at speed.  Unknown event.

Tuesday, March 19, 2013

Inside Story (Post # 20)

I'm still waiting for the next shipment of soda to arrive so I can continue cleaning the Alfatross, so now is a good time to consider the strategy for one of the other major tasks: what to do about the interior.  The first question is how original was the Alfatross' interior when I bought it 14 years and 6 owners after it rolled off the factory floor? Every indication is that the only modifications to its original interior were the addition of the Jaeger chronometer and a few badges to the dashboard, the "Dynometer" slung under the dash, lap belts for the front seats, and replacement of the floor covering with an inappropriate grade of carpeting. 

A faded Polaroid photo of the Alfatross' interior in 1965.  It looks more like the
stripped-down cockpit of a racer than that of a grand touring car.
The Alfatross' original interior was Spartan, to say the least, and in keeping with its intended purpose as a race car. The materials used were "economical": naugahyde for the seats, interior panels, and headliner, and some kind of thin synthetic carpeting on the floor. Restoration to original specification would be fairly simple and relatively inexpensive, but is that the way to go? 

Originality vs. Renovation

A few years ago I had the opportunity to examine two of the Alfatross' siblings at a car show back East. One was an unrestored "barn find" and the other was an achingly beautiful restored example. The barn find's interior was similar to the Alfatross' in its simplicity, but there were differences that made me wonder how much of it was original.


The "barn find" 1900 SSZ's interior differs from the Alfatross' in that the seats
are much larger and more refined.  The shifter is on the column rather than on
the transmission hump.  The dash is flat (no bulge for the instrument cluster)
and the glove box has no lid.  The steering wheel is wrapped with some sort
of cord.

The barn find's interior is remarkably fresh-looking with little
 signs of wear.  This is possible if was never used much and was
stored indoors for most or all of its life. 

Almost a twin of the Alfatross, the restored 1900C SSZ sported an interior that was faithful to original appearance, but finished in upscale materials.  The seats and headliner were done in fine leather with contrasting piping.   The carpeting was similarly perfectly fitted and tastefully matched.  It seemed to me to be a good compromise between originality, improved creature comforts and appearance.


The interior of the Alfatross' restored twin: beautiful, functional, and faithful
 to the original design. 
Is this nice or what?
A sympathetic restoration of the Alfatross' seats
would look like this.

Another "barn find" 1900 SSZ manufactured in the same year as the Alfatross turned up in the last few months: http://www.kidston.com/kidston-cars/2425/1955-Alfa-Romeo-1900#.  Although its interior is in poor condition it is clear that the light-weight, small seats are similar to those of the Alfatross and the restored car mentioned above, but the upholstery is different.  The basic layout elements are the same but like the other barn find example the glove box is open, and the instruments are laid out differently due to the flat dash top.

Barn Find car #2.  Is that the remains of carpeting on the floor?
Barn find car #2.  Note the flat dash, open glove box pleated
 seat upholstery, Alfa steering wheel and unidentifiable floor
 covering.
We know that there was little standardization on either the inside or outside of these cars.  Being hand-made, each has its own unique character.  So how do you establish things like authenticity and originality, particularly after the passage of almost 60 years?  Where is the yardstick to measure them by?  

My choices for the Alfatross seem to be:
  1. Keep everything original no matter how shabby.  Just wipe it down and put it back, or . . .
  2. reupholster the seats and interior fabric panels with new materials that are a perfect match with the originals, or . . .
  3. reupholster and re-carpet the interior with higher grade materials more in keeping with the rest of the car and with the restored Nardi wheel, Veglia gauges, and chrome and polished aluminum hardware, or . . . what?
Anybody out there have any advice? 


Saturday, March 16, 2013

Soda Blasting the Alfatross (Post # 19)

Many years ago I started using paint remover t chemically strip the Alfatross. It may have been due to a defect in the way it was repainted in 1965 or 1966, but something was causing the paint to separate from the metal in big flakes.  It was hard work and I didn't like breathing the solvents that are in paint removers.  After doing most of the exterior I could see that cleaning the bottom, interior, and engine room would be just about impossible.  So I put it aside until a better option presented itself.  The advent of soda blasting was the answer to my prayers--and Dave bought one for his shop!

A section of peeling paint on the Alfatross's hood.  There is a clean separation
 between the aluminum body and primer--repainting was mandatory!

Turn Up the Volume!

We got the Alfatross up on the rotisserie last Monday evening.  On Tuesday I was still examining my options for procuring a compressor that could provide the necessary volume and pressure.  Soda blasting is not a job for your average shop compressor--and mine is pretty wimpy anyway.  According to the soda blaster manual you could need as much as 50 CFM at 90 PSI depending on what size orifice and restrictor combination you use.  You would spend $8,000 or more to buy a compressor with those specifications.  It's more than I want to spend for something I use only occasionally.

The solution was to rent a trailer-mounted, diesel-driven compressor like the kind used to power jackhammers.  The local United Rentals let me have one for $200/day or $600/week. All I had to do was cobble together the proper connections. Piece of cake.

Blasting with sodium bicarbonate (NaHCO3) is like blasting with any other type of media, but it has special properties that make it desirable. It won't scratch hard metals like chrome and it usually won't damage rubber or glass.  But compared to sand and other more common types of media it is somewhat pricey.  A 50 lb bag of the formula I like costs $80 by the time you factor in shipping--and you can go through a couple of pounds per minute!  Dave's soda blaster can be used with water jets if desired, but I am electing to go with just soda for the time being.

The Alfatross mounted on the rotisserie BEFORE soda blasting.  Note the patches
of paint and primer still left on the surface after chemical stripping.

At the risk of spoiling the suspense, here's the Alfatross after just 3.1hrs of
actual compressor time (spread out over 8 hrs of fiddling around and setting up).
I was doing a lot of new things at the same time, experimenting to find out which soda formula worked the best, which pressure I should use, whether I should use a restrictor to reduce the amount of media being used, how to turn the Alfatross on the rotisserie safely, etc., so I didn't spend that much time actually blasting.  Still, I used the 150 lbs of media I had on hand in only 3.1 hours of actually compressor time.

The rented diesel-powered 160+ CFM compressor.  The perfect solution to high-volume,
low pressure requirements.  It delivers air at 140 PSI but the regulator on the
soda blaster reduced the pressure to 87 PSI.


The soda blaster and some of the paraphernalia needed.  Clean up was much
easier than I expected.

Rotating the Alfatross on its rotisserie enables me to get to all the difficult
 places.  Note the difference between the places that have been blasted and
those on the roof that have not.

The bottom of the chassis is going to take a lot of time and perhaps a different
blast media.  I'll experiment with the three types offered by Eastwood Automotive
 to see which ones work the best. 

Yes, it is a dusty job best done on a day with a gentle breeze!

Thanks!

I want to compliment the Car Museum guys, particularly Rich Heinrich and Jean-Marc Freslon for coming up with the unique solution to how to mount an Alfa 1900 Zagato on a rotisserie. They saved Dave and I an enormous amount of time and effort. If you guys are reading this, how about commenting on how you came up with the idea?


From the time spent so far soda blasting the Alfatross, I can tell that I am going to need a lot more soda, so I've ordered another 7 bags (350 lbs).  In order to maximize efficiency I'm going to wait until that order arrives before renting the compressor again.  In the meantime I'll get back to the numerous other sub-assemblies needing attention.